OneScreen Share
User Manual
1. Overview
OneScreen Share is a multiscreen interaction application for smart phones, tablets, or personal computers to interact with OneScreen. Using OneScreen Share you can cast your phone, tablet, and computer screen to the OneScreen and vice versa. It also allows remote control of your OneScreen through your devices. OneScreen Share allows up to 9 users to simultaneously project their screens on OneScreen and is an ideal choice when it comes to mirroring/wireless screen sharing software. Follow the steps below to connect your device with OneScreen L7 using OneScreen Share. OneScreen Share is compatible with Windows, Mac, Chrome OS, Android, and iOS platforms. There are 2 types of apps for OneScreen Share:
- Server App: The application that comes pre-installed on the OneScreen L7
- Client App: The application that is supposed to be downloaded on the user’s device (PC and/or Mobile Phone)
2. Interface
The following Window appears when you open the OneScreen Share App on the L7:

- Wi-Fi Network: Displays the name of the network you need to connect your device to establish a connection with OneScreen L7
- Device Name: Displays the Device ID. This ID is unique for all OneScreen L7s and allows you to identify the OneScreen you wish to connect to in case there are multiple devices in the same premises
- Download Link: You can share your client device’s screen onto the L7 through webcasting by going to this link
- Settings: Allows you to configure the settings of your OneScreen Share Application
- Connected Devices: Shows all the devices connected to the L7 on the Share App
- User Guide: Opens a guide on how to use OneScreen Share
- Connection Code: A pin code that needs to be entered on the Client Device before connecting.
3. Pre-Requisites of using OneScreen Share
There are 2 pre-requisites of using OneScreen Share:
- Make sure that you have OneScreen Share Client Application on the device you want to connect with the OneScreen L7. You can download the Client App on your device by using the link below:
Download Link for OneScreen Share - Connect your Client Device to the same network as the L7. It is recommended to create a Wi-Fi Hotspot on your OneScreen L7 and connect your device to it for best performance while using OneScreen Share. Follow the steps given below to configure Hotspot on OneScreen L7:
i. Navigate to the Hotspot icon on the Homepage of the OneScreen L7

ii. Turn the Hotspot on

iii. Optionally, press on the Hotspot Name to configure the settings for the Hotspot

(Note: You can configure the device name, security settings, password, and the frequency mode of the Hostspot)

4. OneScreen Share for PC (Windows, Mac, and Linux)
Follow the steps below to share the screen of your PC (Windows, Mac, and Linux) with the L7 via the OneScreen Share Application:
- Open the OneScreen Share App both on your OneScreen L7 and your Client Device. You can open OneScreen Share on your L7 by pressing on the Share Button on the Home Page

In case your Client Device is asking for a code, note the 6-digit connection code on your OneScreen Share App’s homepage and type that code in the OneScreen Share Client App.

4.1 How to use Screen Share
You may follow the steps below to share the screens of your PCs (Windows, Mac, Linux) with OneScreen L7 via the OneScreen Share Application:
- Once the connection process is complete, you can click on Start Screen Share to wirelessly cast your Client Device’s display to the L7

- You can either share your entire screen, share a window from a specific application, or use OneScreen as an extended monitor

Once the screen sharing starts, you can access the interaction menu below by moving your cursor on the top of your PC’s screen:

- Full screen: Allows the user to share the screen in full screen mode on the L7.
- Pause: Freezes the current shared screen window on the L7. Opening other apps or windows during paused state would not open them on the OneScreen L7 until the pause mode is disabled.
- Switch: Allows the user to switch to another window or application they wish to share on the L7.
- Touch: Allows the user to enable / disable the touch functionality of the shared screen on the OneScreen L7
- More: Change the clarity or the aspect ratio of the shared screen
- Close: Allows the user to stop sharing the screen onto the OneScreen L7
4.2 How to use Desktop Sync
Desktop Sync allows the user to project the OneScreen L7’s screen onto the PC, allowing the L7 to be controlled from that device. Follow the instructions below to access the Desktop Sync feature of the OneScreen Share application:
- Once the connection process is complete, you can click on Start Desktop Sync to project the OneScreen L7’s display onto your PC

4.3 How to use Device Sync
Device Sync allows users to access the peripherals (Cameras and Microphones) connected to the OneScreen L7, on their PCs. Follow the steps given below to use the Device Sync option:
1. Once the connection process is complete, click on Device Sync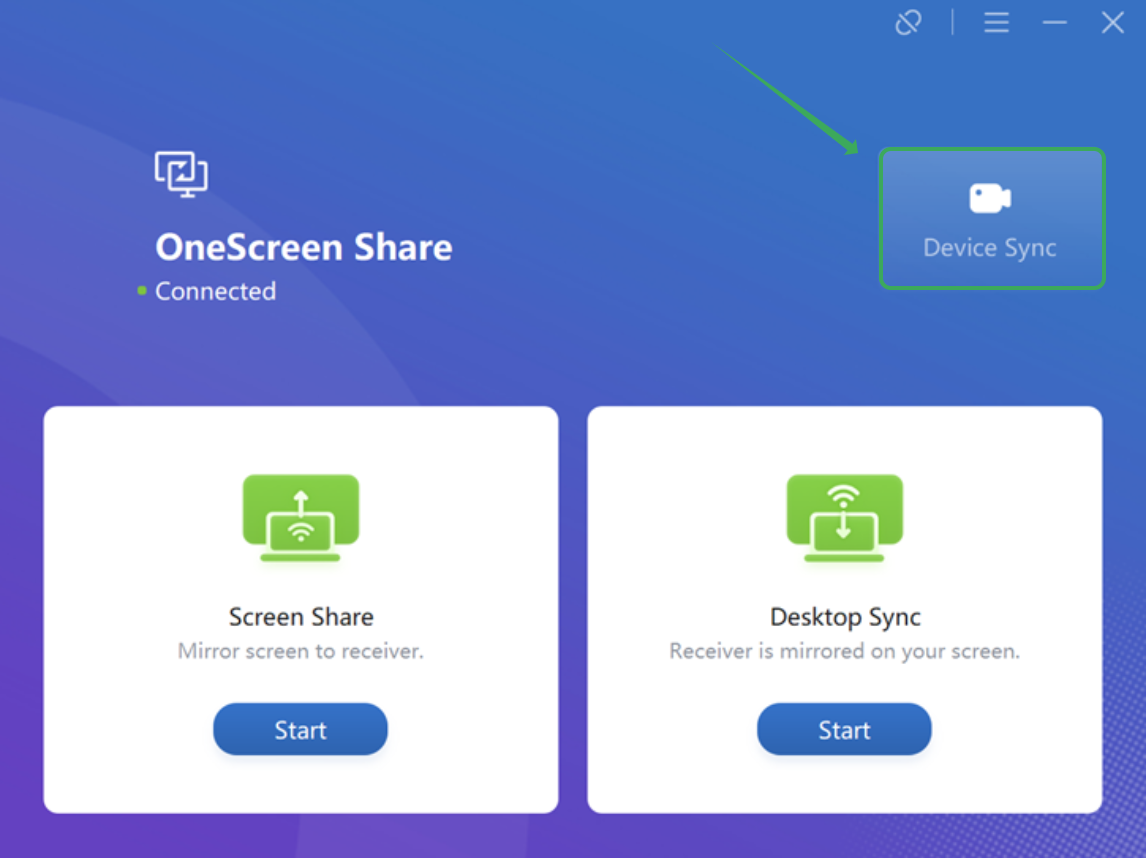
2. Turn on the camera and microphone connected to the OneScreen L7
3. Now, once in a meeting, you will be able to view and select the camera as Sharing Camera and the microphone as Sharing Microphone for your meeting
5. OneScreen Share for Mobile (Android and Apple)
Follow the steps below to use OneScreen Share on your Mobile Phone (Android and Apple):
- Open the OneScreen Share app both on your OneScreen L7 and your Client Device. You can open OneScreen Share on your L7 by pressing on Share Button on your OneScreen

In case your Client Device is asking for a code, note the 6-digit connection code on your OneScreen Share App’s homepage and type that code in the OneScreen Share Client App on your Client Device

Once the connection process is complete, you will be able to see the following interface on the client application:

- Start: Start sharing the phone’s screen on the OneScreen L7
- Media: Share any media file (video / audio) from phone’s storage onto the OneScreen L7
- Photo: Share any photo from the phone’s storage onto the OneScreen L7
- Document: Share any document from the phone’s internal storage onto the OneScreen L7
- Camera: Share the camera feed from the mobile phone onto the OneScreen L7. You can take a picture and it will show up on the L7 (allowing annotations to be made over it)
- Remote: Use your mobile phone as a remote controller for the OneScreen L7
- Desktop Sync: Desktop Sync allows the user to project the OneScreen L7’s screen onto the mobile phone’s screen, allowing the L7 to be controlled from that device
6. Miracast
Miracast allows users to share screens from a Windows PC or Android Phone to the OneScreen L7 using Wi-fi Direct. Hence, the devices do not need to be connected to the same network for screen sharing to work. As Miracast comes pre-installed on most PCs and phones, the user does not need to download the OneScreen Share Client App. Before using Miracast for the first time, you would be required to turn on the Miracast feature in the OneScreen Share app on the OneScreen L7. To do that, please follow the steps given below:
- Open the OneScreen Share application on the L7 and navigate to Menu > Settings

Turn on the Support Miracast device option

6.1 Miracast on Windows PC
You may follow the steps given below to connect your Windows PC to the OneScreen L7 via Miracast:
- On your PC, go into the Display Settings and navigate to Connect to a wireless display and click on Connect

- You will see a list of all available displays. Click on the name of the OneScreen L7 you want to share the screen to

- You can allow or disallow mouse, keyboard, touch, and pen input from this device. Enabling this option allows you to use your personal device using touch on the L7. You can also choose to Duplicate, Extend or use the Second screen only option for this display

6.2 Miracast on Android Phone
To use Miracast on an Android phone, please follow the steps given below:- On your Android phone, navigate to Settings > Connection and Sharing > Screencast
- You will see a list of all available displays. Press on the name of your OneScreen L7 to start mirroring your phone display onto the OneScreen L7
(Note: Screen sharing with some phones does not give touch functionality on the OneScreen L7, that is, the option to use your personal device using touch on the L7)
7. Airplay
Macs and Apple phones use a protocol called Airplay instead of Miracast to allow users to share their devices’ screens with the L7. Just like Miracast, Airplay allows the user to share screen from their device onto the OneScreen L7 without having to download the OneScreen Share client app. Before using Airplay for the first time, you would be required to turn on the Airplay feature in the OneScreen Share app on the OneScreen L7. To do that, follow the steps given below:- Open the OneScreen Share app on the L7 and navigate to Menu > Settings

Turn on the Support Airplay device option

Connect your Client Device to the same network as your OneScreen L7. For a stronger connection and more consistent performance, we recommend that you create a Wireless Hotspot Network on the L7 and connect your device to this network.
7.1 Airplay on Mac
Follow the steps below to connect your Mac to the OneScreen L7 via Airplay:
- On the Mac, Navigate to Control Centre and then click on Screen Mirroring

You will see a list of all available displays. Click on the name of your OneScreen L7. You can choose to either mirror your Mac display or use the OneScreen L7 as an extended monitor

7.2 Airplay on Apple Phones
To use the Airplay feature on the Apple phones, please follow the series of steps given below:
- On the Apple phone, go to Screen Mirroring in the Control Centre

You will see a list of all available displays. Press on the name of your OneScreen L7 to start mirroring your phone display onto the OneScreen L7

(Note: Screen sharing with phones does not give touch functionality on the OneScreen L7)
8. Chromecast
Chromecast allows users to share screen from a PC or mobile device to the OneScreen L7 using wirelessly. The user does not need to download the OneScreen Share Client App to use the Chromecast feature. Moreover, Chromecast does not allow touchback functionality with the L7, hence you will not have the option to use your personal device using touch on the L7. Before using Chromecast for the first time, you would be required to turn on the Chromecast feature in the OneScreen Share app on the OneScreen L7. To do that, please follow the steps given below:- Open the OneScreen Share app on the L7 and navigate to Menu > Settings

Turn on the Support Chromecast device option

Connect your Client Device to the same network as your OneScreen L7. For a stronger connection and more consistent performance, we recommend that you create a Wireless Hotspot Network on the L7 and connect your device to this network.
8.1 Chromecast on PC
You may follow the steps given below to connect your Windows PC to the OneScreen L7 via Chromecast:
- Open Google Chrome and click on the more options button in the top right corner. Then click on Cast

You will see a list of all available displays. Click on the name of your OneScreen L7. You can choose to cast a single tab or the entire screen

8.2 Chromecast on Android Phone
To use Chromecast on the Android phone, please follow the steps given below:
- Open the YouTube app and press on the connect to a device option on the top

You will see a list of all available displays. Click on the name of your OneScreen L7

9. Guest Mode
In case you do not have the OneScreen Share client app on your device or you wish to make a guest mirror their screen onto the OneScreen L7, follow the steps given below:
- Make sure that your device (Windows, Mac, Chrome) is connected to the same network as the OneScreen L7.
- Open the OneScreen Share app on the OneScreen L7 and navigate to Menu > Settings

Navigate to Share screen via website option and make sure that it is turned on

Open a web browser and go to share.onescreensolutions.com. You will be required to put in a code, note the 6-digit connection code on your OneScreen Share App’s homepage (as shown below) and put it in here


You can share the entire screen, a certain window, or any tab with an option to allow / disallow sharing of the system audio

Hit the Share button and your device screen will be shared onto the OneScreen L7 without needing the OneScreen Share app
10. How to Manage Devices Connected via OneScreen Share
The OneScreen Share Application on the L7 allows you to manage all the devices connected to it. Follow the instructions below section covers how to so:
- Open the OneScreen Share app on the OneScreen L7 and navigate to Devices

This will show you a list of all the devices connected to the OneScreen L7 via the OneScreen Share app and you will see the following interface:

- Device Name: Displays the name of the connected device
- Device Status: Shows the status of the connected device (connected / mirroring / desktop sync)
- Touchback: Allow / disallow the device to control the OneScreen L7 during Desktop Sync mode
- Send Files: Send files directly from the internal storage of the OneScreen L7 to the connected device
- Admin Access: The device which is given Admin Access will be able to manage other users and approve / decline requests from them. Once the Admin Access is enabled, an icon appears on the client app of the connected device as shown below. This icon allows the user to control all the connected devices as shown below

- Disconnect: Disconnect the selected device from the OneScreen L7
- Mirror: Mirror the screen of the device onto the OneScreen L7
- Disconnect All: Disconnect all the connected devices from the OneScreen L7
11. Managing Settings on OneScreen Share
You can manage the OneScreen Share Server App settings by opening the app on the L7 and then navigating to Menu > Settings as shown below:

You will see the following settings as shown below:
11.1 Permission Settings

- Allow this device to be discovered: Once this option is turned on, other devices will be able to connect with the OneScreen L7 through their OneScreen Share application
- Permission Mode: When turned on, every device that will try to mirror its screen or use desktop sync would require permission from the OneScreen L7. Use this option to allow only desired users to share or mirror their device
11.2 Screen Sharing without Client Settings

- Support Chromecast device: Allows users to connect their devices to the OneScreen L7 using Chromecast from their PCs, Chromebooks, and Phones. For more details, visit the Chromecast Section in this guide
- Support Airplay device: Allows users to connect their devices to the OneScreen L7 using Airplay from their Macs and iPhones. For more details, visit the Airplay Section in this guide
- Support Miracast device: Allows users to connect their devices to the OneScreen L7 using Chromecast from their Windows PCs, and AnPhones. For more details, visit the Miracast Section in this guide
- Share screen via website: Allows the users to connect their devices to the OneScreen L7 using Webcast (through an online browser instead of the OneScreen Share Client App). For more details, visit the Webcast Section in this guide
11.3 General Settings

- Device Name: Allows you to change the Device Name that is visible to other devices attempting to connect
- Start automatically on boot: When turned on, the OneScreen Share app starts up as soon as the OneScreen L7 boots up
- Code refresh rate: Determines the time interval for which the connection code for the OneScreen Share app remains the same. You can also change it to Never to prevent the connection code from changing or put it to a smaller interval to prevent unnecessary connections to the OneScreen L7
- Floating window size: Determine of the floating window that displays the connection code on the OneScreen L7. You can choose to hide this window to prevent unnecessary connections to the touch screen
11.4 Help and Improvement Settings

- Product User Experience Plan: When enabled, the app collects general statistics from customer usage to help OneScreen improve their products and services
Log Feedback: Generates a log of instances and bugs for troubleshooting purposes
Was this article helpful?
That’s Great!
Thank you for your feedback
Sorry! We couldn't be helpful
Thank you for your feedback
Feedback sent
We appreciate your effort and will try to fix the article